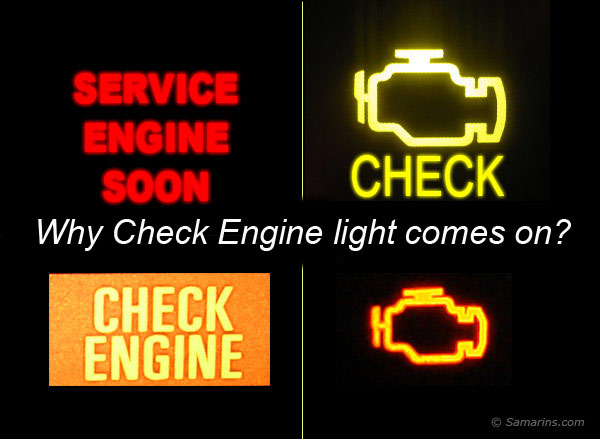
Sunday, August 12, 2012

Why Check Engine light comes on?


Check Engine - Service Engine Soon light
The Check Engine or Service Engine Soon light or an icon resembling the engine is called, in technical terms, the Malfunction Indicator Light or MIL. The MIL light comes on when your vehicle's computer detects a fault that can affect your vehicle's fuel economy and the exhaust emissions. There is no button to reset the Check Engine light, but if the fault that caused it doesn't happen again, the light will turn off by itself. If the MIL light stays on, have the problem checked out, because in some cases, the problem could get worse if not repaired in time. Think of the Check Engine light as an early warning sign. 
  
How the OBDII system works
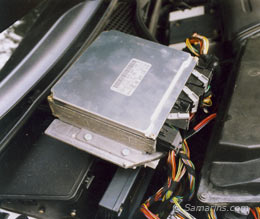
Engine computer or the ECM
All modern cars and trucks have a computer (in the photo) that controls the operation of the engine, automatic transmission and emission control systems. This computer is usually called the Electronic Control Module or ECM (SAE term: Powertrain Control Module or PCM). The main purpose is to keep the engine performing at the most efficient level while keeping the exhaust emissions low. To achieve this, the ECM constantly adjusts the engine and transmission parameters according to the speed, load, engine temperature, gasoline quality, ambient air temperature and other conditions. We usually don't notice how it works, but from the moment you turn the ignition on, everything is controlled by the computer. On some cars, even after the car is shut off, the ECM runs some tests to check some of the components. 


All passenger cars and trucks sold in North America since 1996 are OBD-II compliant. The OBD-II or On-Board Diagnostics version II standard among other things requires the vehicle computer system to have a self-testing capability. The ECM constantly monitors all the sensors and periodically tests electronic components and emission control systems. If the ECM detects a problem with some of the electronic components or the signal from one of the sensors is out of normal range, it turns the Malfunction Indicator Light or MIL on. At the same time, it stores the correspondent diagnostic trouble code (DTC) in its memory. For some problems, the ECM also stores the freeze frame of the engine parameters at the moment the fault was detected. Read more about the freeze frame below.
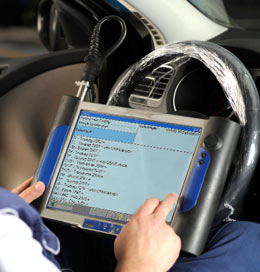
Scanning the car computer for check engine codes
Once you take your car to a dealer or repair shop, a technician will hook up the scanner to the car's OBDII diagnostic connector and retrieve the stored diagnostic trouble code or codes, as well as the freeze frame. Then, he (she) will look up the code in the service manual provided by a car manufacturer. The service manual contains the list of diagnostic trouble codes (around a few hundreds) and describes what each code means, how to troubleshoot it and what parts need to be tested. The diagnostic trouble code itself doesn't tell exactly what component is defective; it only indicates where to look, what engine parameter was out of normal range. The technician will have to perform further testing to pinpoint a defective part. Once the repair is completed, a technician will reset the "Check Engine" light. If you have necessary skills, a good scan tool and the repair manual, you can diagnose the problem yourself. Read more about this below.

Q: What to do if my "Check Engine" light comes on?

A: If the "Check Engine" light came on soon after a fill-up at a gas station, check if your gas cap is closed properly. Secure the gas cap if it wasn't tight, and if there are no other problems, the "Check Engine" light should reset by itself after a few trips. If the gas cap was tight, there is some other problem with the engine, transmission or emission control system components in your vehicle. You should have your car computer scanned to see what is wrong. It could be some minor or intermittent issue; but it also could be something that can cause more damage to your vehicle if not repaired in time. Typically dealers and auto repair shops charge a diagnostic fee for scanning the car computer. Some auto parts stores and auto repair shops, however, advertise that they will scan you car for free, in hopes that you will buy parts or do the repairs at their shop. Try googling 'free check engine light scan' + ' your town' to find a shop that will scan your car for free. Once you know the code, you can google it again along with your car make and model, e.g., P0171 Ford Explorer. Do a little research and you will have an idea what is the problem and what to do, because somebody probably had the same problem before and posted the information. We also have common check engine codes listed along with examples of possible problems along with common repairs; check here: OBDII trouble codes. 

If your car is not too old, have it scanned at your dealer, because it's possible that the problem is still covered by the emission warranty and can be repaired for free or a minimum charge. The US Federal Emission Warranty covers major emission control components for the first 8 years or 80,000 miles. Check your warranty booklet for details, or call your dealer. Again, doing some research ahead of time can help in case the dealer refuses to warranty your problem.

Q: Is it safe to drive with the "Check Engine" light on?

A: It really depends what the problem is, what caused the "Check Engine" to come on. It could be something really minor, but it also could be something more serious that needs to be taken care of as soon as possible. In worst cases driving with the "Check engine" light may cause more damage to the vehicle. Here is a very common example:


Often, due to a bad mass air flow sensor, vacuum leak or some other reason, the air-fuel mixture entering the engine becomes lean or there is too much air and too little fuel. The engine computer tries to compensate by adding more fuel, but it only can compensate within a certain limit. If the engine computer can no longer compensate the lean condition, it turns on the check engine light and store the corresponding code in its memory, typically P0171 - System Too Lean (Bank 1) or P0174 - System Too Lean (Bank 2). If caught in time, this problem may require a simple repair and more troubles could be avoided as the lean air-fuel mixture causes pre-ignition or detonation, and this could lead to serious engine problems. If your check engine light came on, I certainly recommend to have your car checked out as soon as possible to be on a safe side. If the Check Engine light is flashing, it means that the engine computer (ECM) has detected that your engine is misfiring. Driving with a misfiring engine could damage your catalytic converter, which is a very expensive part. Often the misfiring could be caused by bad spark plugs and wires; if you haven't done a tune-up in a while, it might be a good idea to do it now for a start.

Q: Will disconnecting the battery reset the "Check Engine" light?

A: Disconnecting the battery may reset the Check Engine light in some cars, but it will come back anyway if the problem is still there. Besides, the problem may still be covered by the emission warranty (typically 8 years or 80,000 miles) and repaired free of charge by your dealer. Also, the readiness code will be erased, which may prevent your car from completing an emissions test (I/M). The readiness code is an indication that certain emission control components of your car have been self-tested. In addition, the radio, if code-protected, may be locked after disconnecting the battery.

Q: How long does it take for check engine light to reset?

A: If the problem that caused the check engine light to come on is fixed or no longer exists, the check engine light will turn off. For some faults, it may take just a few minutes of driving; for other problems, it may take a few trips. This is because it takes time for a car computer to re-test all the components. If the Check Engine light doesn't clear itself after a couple days of driving, the problem is most likely still there.

Q: Can overfilling the gas tank cause Check Engine light to come on?

A: Yes, overfilling the gas tank can trigger the "Check Engine" light to come on. Modern cars are equipped with the Evaporative System that prevents gasoline vapors from escaping into the atmosphere. When we overfill the gas tank, the excess gasoline can enter the part of the Evaporative system called the Charcoal Canister, which is designed to absorb gasoline vapors rather than raw fuel. This can cause some problems with the evaporative system that can trigger the Check Engine light.

Don't overfill the tank past the first click of the pump. Check your owner's manual.

OBD trouble codes

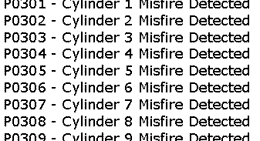
The trouble codes on all OBDII cars are standardized and each code has the same meaning on all OBDII cars. There could be some minor differences in the way different car manufacturers interpret the same trouble code, but the basic meaning is the same. A typical OBDII trouble code starts with a letter that is followed by four digits. The letter "P" stands for powertrain, the letter "B" for body. For example, if the engine cylinder number 2 would misfire, the car computer (ECM) would turn on the "Check Engine" light and store the diagnostic trouble code P0302 in its memory. If you'd connect the scan tool, it would read something like: P0302 - Cylinder 2 Misfire Detected. Overall, there are a few hundreds trouble codes for the powertrain, but only about 40-50 codes are very common. You can read more what some of the common powertrain codes mean here: OBDII Diagnostic Trouble Codes

Freeze Frame

Freeze Frame
A freeze-frame is a snapshot of the engine and transmission parameters at the moment when the engine computer detected a fault and the trouble code was stored. The freeze-frame may show whether the vehicle was stopped or driven at a high speed, whether the air/fuel ratio was lean or rich and whether the engine was cold or fully warmed up at the time of the malfunction. The freeze frame is stored in the engine computer along with the trouble code. How can it be useful? Checking the freeze frame can help identify the problem faster. For instance, if you look at this image, this freeze frame for the code P0116 - Engine Coolant Temperature Circuit Range/Performance indicates that the engine coolant temperature was -40F while the intake air temperature was 84F, which is obviously impossible. The engine temperature should be close to the ambient temperature (intake air temperature) if the car is just started or it should be a lot higher if the engine is warmed up. This means that the engine temperature sensor didn't register the correct temperature. This was most likely caused by either a faulty engine temperature (ECT) sensor or poor connection at the sensor. Looking at this freeze-frame, you also can see that the car was idling at the moment this malfunction was detected (the engine speed showed 756 RPM) and the vehicle was stationary (Vehicle Speed at 0 MPH).

Q: I have a scan tool. How to scan a car for codes?

DLC OBD II Data Link Connector
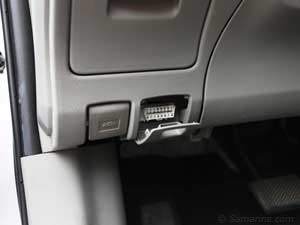
(OBD II Data Link Connector )
A: It's not very difficult to scan your car computer for trouble codes if you have a scan tool or OBDII software and some technical knowledge. Scanning the car computer for codes is easy: 


Step 1: Find the DLC Connector. An OBDII-compliant vehicle has a standard diagnostic connector, which is in technical terms called Data Link Connector or DLC. The DLC is identical on all OBDII cars and should be located within three feet of the driver. Usually the DLC connector is located at the lower portion of the dashboard on the driver side, like this one in the photo. In some cars the OBD DLC connector is hidden under a cover, but the connector still looks like the one in the photo.


Scan tool connected to the DLC
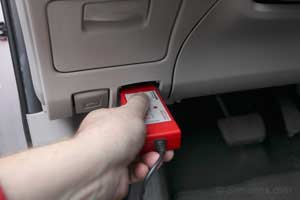
Connecting the scan tool


In some cars the DLC connector might be near the fuse panel; in some Acura cars it's under the ashtray. In some Volkswagen models the DLC connector is hidden under the slide cover at the center console. Some cars have the sign 'OBD' marked on the DLC connector cover. 


Step 2: Connect the scan tool:
Scanning the engine computer doesn't take much time. You connect the scan tool, turn the ignition ON and follow the scan tool menus to get to the DTCs (Diagnostic Trouble Code) and read the code. If your scan tool can access the freeze frame, check it too, it may help. Check the scan tool manual for details. 


Trouble code displayed on a scan tool screen
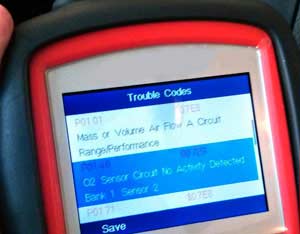
Trouble code displayed on the
OBDII scan tool

Once the fault code is retrieved, more testing is needed to find the defective part, as the code only gives the parameter that is out of range. For example, the DTC P0401 reads "insufficient EGR system flow", but it could be set for a number of reasons, such as a bad EGR valve, clogged EGR passage or a faulty DPFE sensor. Another example: The code P0341- Camshaft Position Sensor Circuit Range/Performance points to the camshaft position sensor, but it could be caused by variety of reasons including stretched timing chain, improper timing, problems with the variable valve timing system etc.

How to diagnose a trouble code:

As I mentioned above, the trouble code itself does not tell exactly which part to replace, so throwing parts at the problem without diagnosing it properly is not the right approach. There is no single way to diagnose a trouble code, as the codes only point to what parameter or signal is out of range. The system or sensor related to the code needs to be tested according to troubleshooting flow-chart found in the service manual. If you don't have the proper equipment nor the access to the service manual, you can try researching for common problems, because usually the same trouble code in the same-model car is often caused by the same type of fault and there is a good chance that it's a known problem and somebody already posted the solution for this problem. For example, if you have Honda CR-V with a code P0134, the research will show you that very often the code P0134 is caused by a faulty front air/fuel ratio sensor.

We did the research for you on many trouble codes and posted possible faults, common examples, areas to check and possible repairs. 

If we don't list the code you have in your car, google it along with your car's make, year and model; somebody might have had the same code already and posted the possible repair.

Where can I buy an OBDII scan tool or software?
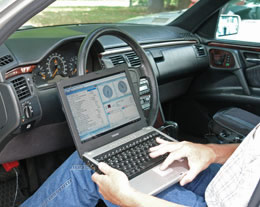
An OBDII or EOBD scan tool can be bought at an auto parts store, or online. A simple OBD code reader may cost anywhere from $35 to $200. You also can buy an adaptor with the software for your laptop. There is even an OBDII app for the iPhone, but it requires a separate hardware interface. The software with the adaptor for the laptop cost form $150 to $450, depending on the available functions. If you have some technical knowlege, I'd recommend to buy a scan tool or software that has a capability to display the live data.
An OBDII scan tool should work on any OBDII or EOBD compatible car. An OBDII / EOBD scan tool cannot be used to diagnose the Airbag or ABS light. To diagnose the airbag or ABS issues might need to visit your dealer. Similarly, an OBDII scan tool will not connect to the Body Control Module (BCM).

Tips to prevent the Check Engine light from coming on

  • Don't overfill the fuel tank. Fill up till the first click of the pump. Overfilling can cause problems with your vehicle's Evaporative emission control systems (EVAP) resulting in the Check Engine light coming on.
  • After filling up, make sure the gas cap is tight and the gas cap strap does not get caught under the cap.
  • Change engine oil regularly. Long intervals between the oil changes do not directly cause the Check Engine light (MIL) to come on, but many MIL-related problems stem from lack of oil changes.
  • After checking or replacing the air filter, make sure it's installed properly. If unfiltered air is allowed into the engine it can cause damage to the vehicle's mass airflow (MAF) sensor, which will turn the MIL on. It's best to use only OEM or known good quality air filters.
  • Lack of tune-ups is another common reason for the Check Engine light to come on. Old spark plugs, dirty throttle body, bad ignition wires all can cause engine problems with the Check Engine light coming on.
  • The corrosion in the wiring and connectors of the car computer system is another major cause of the Check Engine light problems. Your car or truck is full of electronics with wires and connectors located in many places throughout the vehicle, icluding areas behind the kick panels, under the carpet, in the engine compartment, underneath along the frame, near the gas tank, etc. Anything you can do to keep the electronic modules and wiring free from corrosion will help avoid related problems. For example, if your engine undercover is damaged, it can allow moisture into the engine compartment causing corrosion. Similarly, moisture inside the car can cause corrosion of the wiring under the carpet. Keep the electronics dry.
  • When doing repairs, use original parts when possible. Sometimes the Check Engine light comes on because some aftermarket parts like oxygen sensors, mass airflow sensors or catalytic converters can have compatibility issues.

Thursday, May 17, 2012

Diagnosing car noises

We often receive questions about what can cause one or the other noise in a car or truck. Of course, it's very difficult to diagnose the noise without even seeing a vehicle. Sometimes, even when you take your vehicle to a mechanic, it may take a lot of time to find the source of the noise. To help you with diagnosing the noise, we decided to describe few common noises and their sources in a car or truck. 

Of course, If you have any irregular noises in your car or truck, It's always best to have your vehicle checked out to keep it safe. Don't forget to bookmark this page for future reference!

Drive belt and timing belt noises

Drive belt
Drive belt

 A loose drive belt can slip causing a loud high-pitch squealing or whistling noise. Usually you can hear it when the engine is just started or when the steering wheel is turned to the limit in either side. It is a fairly simple job to adjust the drive belt tension, so it should not cost you a lot when you take your vehicle to a mechanic. Driving with a loosened drive belt can cause many other problems, e.g. low battery charge, overheating, lack of power-steering assist, etc. 

Drive belt idler
Drive belt idler

 A worn-out drive belt can cause chirping or squeaking noise that is usually more noticeable after driving in the rain. This happens because the water gets on the belt and washes off the dust. This type of noise can also be caused by misalignment of the belt pulleys. Have the drive belt checked, it's not an expensive part to replace.

A worn-out bearing inside the belt idler or tensioner or can cause a whining or buzzing noise. A bad bearing in the alternator also can cause a similar noise.

A timing belt works in a similar way as a drive belt and can produce similar noises. One thing is different, the timing belt can make a whirring or whining noise when it rubs against the belt cover. If the belt is too tight or something is misaligned or not installed properly, it also can produce a similar noise. If after replacing the timing belt you get this type of noise, have the installation of the timing belt rechecked.

Engine noises


Car engine
Car engine
 An engine has a lot of moving and rotating parts and it can produce a variety of noises. Most of the internal 'mechanical' noises in the engine are usually caused by lack of lubrication, so checking engine oil should be the first thing to do with any internal engine noise. Here are few common noises: 

A vacuum leak can cause a hissing noise that is noticeable at idle. Typically a vacuum leak can also cause the engine to run rough at idle or the engine RPM to be higher than normal. Look for disconnected or cracked vacuum lines or other sources of a vacuum leak.

 
Car engine
Piston with a connection rod
 The pinging or high-pitch metal knocking noise that is more pronounced under acceleration, especially when the engine is hot or under heavy load, could be caused by a detonation in the cylinders. The detonation, or as it's commonly known, 'spark knock', could happen for many reasons. Often using the fuel with lower than specified octane rating could cause the engine pinging or detonation. The excessive carbon build-up in the combustion chambers or too advanced ignition timing can also cause detonation in the cylinders. Sometimes when the engine runs too lean (more air less fuel) it also can produce a detonation knock, because the lean air-fuel mixture increases the temperature in the combustion chambers. A clogged catalytic converter can also cause the detonation or pinging. If your engine makes this type of noise, have the issue diagnosed before it can lead to more problems. Driving with pinging engine can cause many serious engine problems including blown head gaskets, burnt valves and broken or burned pistons. See the photo. 

Broken piston
Pistons can break as a result of detonation
A tapping noise that is coming from the top of a OHC or DOHC engine is often caused by lack of the oil pressure or worn out or out-of-adjustment valve train components. Again, check the engine oil level first. Sticking hydraulic lifters, which is a common problem in older OHV V6 and V8 engines, could also be the source of tapping noise. Some engine additives can help to free the lifters and get rid of the tapping noise.

The piston slap can cause a knocking noise, especially when the engine is started cold. It happens when the pistons are not perfectly tight in the cylinders. When the pistons are pushed up and down, the piston skirt 'slaps' against the cylinder walls. It's a fairly common issue in many cars. Sometimes an engine can run for a very long time with the piston slap noise without it causing any other issues. Sometimes an engine may require an overhaul to repair the issue.

Excessive wear in the crankshaft main bearings can produce a heavy knocking or thumping coming from the bottom of the engine. Sometimes, the main bearing noise can go away when the engine is revved. Sometimes it can be more pronounced when the engine is decelerating.


The connection rod bearing noise also sounds like heavy knocking coming from the engine block. Typically the connection road bearing noise gets louder when the engine is accelerated. The crankshaft bearings are lubricated by engine oil and most of the time, problems with crankshaft main bearings or connection rod bearings are caused by lack of lubrication. It could be a result of low oil level, clogged oil pick-up screen, low oil pressure, poor quality oil, lack of oil changes etc. Both, the connection rod and crankshaft main bearing knock typically requires a complete overhaul of the engine. 


Exhaust noises
Exhaust manifold
Exhaust manifold   
A leaking exhaust manifold can cause a ticking or tapping noise, which is typically louder when the engine is started; the noise could also be accompanied by the exhaust smell from the engine area. Usually this type of noise disappears or quiets down after the engine runs for a few seconds. The exhaust manifold leaks are usually caused by broken manifold studs or cracks in the exhaust manifold.

An exhaust heat shields are the common source of metallic rattle with the engine running. Usually the rattling noise comes from underneath the car and intensifies at a certain engine RPM. This type of noises is usually easy to repair: the loose heat shields are typically secured with worm gear clamps. 

Steering and suspension noises
Outer tie rod end
Outer tie rod end in a front-wheel drive car 

Suspension and steering noises also need to be checked out as soon as possible to be safe. When a suspension component, such as a tie rod end or a ball joint is badly worn, it can separate, sometimes even causing the vehicle to lose control. If you hear a knocking or other noise from the steering or suspension, have it checked out. Here are few examples of the typical suspension and steering noises. Of course, there could be a lot more problems in the suspension and steering that can cause various noises. Any noise should be properly diagnosed.


Front stabilizer bar link
Stabilizer bar link 

A bad tie rod end usually causes a rattling or knocking noise from the front end when driving slow over small bumps or rough road. After a bad tie rod end is replaced, the wheel alignment procedure must be performed.

A stabilizer bar link can cause a similar type of noise. It may sound as a not very loud knocking when driving slow over small bumps. Worn out stabilizer bar bushings also can cause a similar noise. Either part is not very expensive to replace. 

Lower ball joint
Lower ball joint

A bad ball joint can cause a clunking or knocking noise coming from the front suspension. Depending on the design, a vehicle may have one, two, three or even four ball joints in one side of the front suspension. Sometimes, a ball joint comes as an assembly with a control arm. After the control arm assembly or a ball joint is replaced, the wheel alignment procedure usually needs to be performed. 

A bad upper strut mount bearing could cause a clunking or popping noise coming from the front end while turning the steering, even when the car is stationary. It may feel like something jams and then releases when you turn the steering. 

A bad steering shaft joint or lack of lubrication in the intermediate shaft splines in the steering can cause a clunk in the steering column while turning. An excessive wear in the steering rack can also cause similar noises. The repair depends on the defective part.
Low power steering fluid level or air present in the hydraulic power steering system can cause loud moaning, buzzing or whining noise coming from under the hood when turning. The fix is to check the power steering system for leaks and repair if needed, add power steering fluid and bleed the power steering fluid system.

Drivetrain noises

Broken CV boot
Broken CV joint boot. 
A bad front Constant Velocity joint or CV joint will typically produce a clicking or popping noise when driving through turns, especially with acceleration. Usually the CV joint goes bad after the CV joint boot is damaged (in the photo). In most cases, a whole drive shaft will need to be replaced and it could cost a few hundred dollars. Read more about CV joints

Front wheel bearing
Front wheel bearing.
 A bad wheel bearing causes a humming or growling noise that gets worse with speed. It usually gets quite loud when driving on a highway. It's not always to diagnose a noisy wheel bearing, but here is a tip: the wheel bearing humming noise in most cases gets louder when turning to one side and quiets down a bit, when turning to another side. Replacing a wheel bearing is a few hundred dollar repair. Read more about the wheel bearing problems. 

A deteriorated oil in a limited slip differential could cause a clattering or chattering noise coming from the rear end during turns. For example, Honda CR-V is known to have this issue. A new oil of the proper grade usually can fix the noise. 

A problem with a rear differential can cause a humming or growling noise from the rear end that gets worse with the speed. Usually the rear differential will need to be rebuilt or replaced.
 
Tire noises

Cupped tire
Cupped tire
 A cupped tire can produce a loud ramble or a growling noise that may sound like a bad wheel bearing. If you click the photo to see the larger image, you can see that the tire is not rounded along the tread. Its wear pattern has alternating flat and elevated spots. It's easy to feel it with your hand, moving it around the tread. Obviously this tire won't be quiet, especially at higher speeds. 

Friday, December 23, 2011

Understanding the Secrets of Window Cleaning

Let’s face it. When it comes to window cleaning of our vehicles, many of us fail miserably. We try with so many different washer fluids as well as paper towels and store cleaners, yet we never do obtain the invisible glass that we covet so deeply. We must be going wrong somewhere, but where exactly?

Paper towels work well to a certain extent, but use the wrong one, and you could end up with tiny debris or ‘hairs’ on your windows. Not something to look forward to.
Providing the solution to this problem is a very simple answer which has been used by the older generation for years now, newspapers! There is something unique about newspapers that make them extremely efficient to use to clean car windows. In addition, they are practically free as we are utilizing old newspapers that you would want to throw away anyway.

How to we clean car windows with newspapers? Here is a step by step guide of accomplishing just that:

1) Make sure that you have a good cleaning solution with you, the average window cleaning solutions that are available in the market today would work just fine. If you are not happy with them, you could create your own by adding 1 part of alcohol and 10-12 parts of water together with a little bit of ammonia to the solution, this would work exceptionally well as a window-cleansing solution.

2) Next coat the entire surface of the window with the solution, and wipe the window clean to remove dust and pollen using a paper towel.

3) Next come the newspapers. Add water to the newspapers to make them soft, and shape them into a ball. In a circular motion, start from the edges of the windows and work on cleaning your windows until you see them really clean. If the newspaper ball gets too damp and starts to break, make a new ball and continue along the same line.

4) Finally, do not forget to perform the same for the other side of the window to obtain the best possible results. Repeat for all your windows, and you would find them all gleaming in no time.

A word of caution, while newspapers work well on glass, they do not work on plastic window tints, so if you have tints installed, avoid using newspaper on them as they might cause scratches on these window tints. In this case, use soft polishing towels that might prove to be a bit more costly, but they do the job well enough. Keep these tips in mind the next time you tackle your windows, and good luck in making them look as good as new!

Thursday, December 22, 2011

Windscreen Maintenance


The windscreen of a car is an extremely important portion of the vehicle. Considering that your visibility is largely dependent on how good your windscreen and its condition is, it is imperative that you keep you windscreen clean and in the best of conditions. Visibility is usually affected by either condensation on the windscreen, or sometimes extremely heavy rain that leaves water stagnant on the screen.

For stagnant water issues, you could use a water repellent on your windscreen. There are many types of brands when it comes to water repellents such as Rainax in the market today, and most of them do the job effectively. These repellent serve to capture water droplets and move them away from the driver’s visibility range, thus making visibility a lot better even without the use of wipers.

The repellent is also easy to apply as they usually come in liquid form, simple apply them with the use of a damp cloth. Pour the solution on the outside of the windscreen, and use to cloth to apply it uniformly across the entire surface. For best effects, go in circular motions and apply come force when you apply the solution onto the windscreen. Lastly, wipe off the subsequent white layer that forms for best effects.

Condensation is the major culprit that fogs up the car’s windscreen, and makes driving unsafe during rain and cold conditions. Contrary to what many think, the solution to this problem is actually simple and easy to accomplish, one only needs a sponge and some dish washing liquid soap.
 
Soak a few drops of the liquid soap onto the sponge, and sweep the sponge across the entire surface of the windscreen. Take note that this has to be done on the inside, not the outside of the windscreen. Thus wipe the sponge across the windscreen from inside the car in a vertical motion, try to make these movements as vertical as possible. Avoid going in circles as it would not be too effective. If you see bubbles or soap on the windscreen, use a dry cloth to with the windscreen clean. Establishing this action would help avoid condensation issues and assist extensively to better a driver’s visibility during difficult conditions.

Remember, maintaining your windscreen well would definitely help in ensuring that your driving experiences are much safer ones. Safety first!

Sunday, December 18, 2011

Window Tints - How Important Are They?


In tropical countries such as Malaysia, window tints have become more of a requirement rather than a luxury. Almost of all the cars in our country are fitted with window tints, and with good reason too! With the increasing temperatures due to the effects of global warming, the importance of window tinting rises as well! And the fact that these window tints also offer added aesthetic value to your vehicle is an additional reason of why you should install them in your vehicle! Let us now browse through the importance and advantages that are offered by window tinting:

1)    First and foremost, window tints protect the driver and passengers of the vehicle from the harmful UV rays of the sun, as well as help to keep the temperature within the cabin of your vehicle low. When you receive too much of sunlight on your skin without any filters, you risk being exposed to possible health problems such as skin cancer, that results from excessive exposure to harmful UV rays from the sun. Window tints help deflect these harmful rays successfully, thus you are protected from the UV rays while you are driving under the sun. The window tints also help to avoid your cabin overheating, thus you could safely leave your car exposed for hours in the sun, and it would not feel like an oven when you get into it. Expect a lower internal temperature within the vehicle when you have the tints installed.


2)    Window tinting makes your car look substantially better. With numerous colors and shades to choose from (in accordance to the color of your car), increase the aesthetic value of your car by applying window tints on the window that would not only protect you and your car, they would also make your car stand out in a crowd! It could also prove to be a crucial criterion to mention when you are planning to sell your car in the future, and could result in your fetching a higher price for your car.


3)    It helps in theft protection, as car thieves would not be able to see inside your vehicle easier, and would not be able to penetrate the windows easily as they are protected with an extra layer.


4)    Window tinting also assist in protecting the polymer components within your vehicle better, as they get more protection from the damaging sunlight once you have your tints on. This would mean your car’s interior components would end up lasting longer, and results in less expenditure in replacing or repairing these components.


Having understood the importance of window tinting, if you have not yet installed tints on your vehicles, I guess it is time you do so?
 

Saturday, December 17, 2011

Gleaming Your Wheels Effectively


If you are looking to having a sleek looking car, in addition to making sure that the paint work gleams, you would also have to ensure that your wheels shine at the same time! Most people fail to keep their wheels gleaming as they do not know the exact ways or methods to keep their wheels sparkling clean. Perhaps this articles might help guide you in the right direction in this aspect!

Firstly, ensure that your rims are clean before you plan on making them gleam. How do you make your wheels clean you may ask. Well, work on one rim at a time, and spray the dry rim with a rim cleaner, one that is available in most auto stores or even departmental stores. Let the chemical soak for a bit before you rinse it off with a pressure spray. If you don’t own a pressure spray, a normal water hose would have to do. Remember to direct the spray downwards so that the abrasive wheel grime does not damage your vehicle’s paintwork. Thus try to use a medium-pressure spray, a high-pressure spray would be difficult to control.

The chemical within the wheel cleaner would be able to successfully clean any brake dust on your wheels, thus it would help your wheel cleaning and gleaming process extensively. Next use a solution of soap and water together with a sponge and clean away all remaining dirt and grime from your rims. Remember always to rinse the sponge clean before you dip it into the bucket again, as this would significantly reduce the amount of grime that would pollute your soap and water solution.
Some of the tight areas within your wheels would not be accessible with your sponge, thus what you could do is to use a soft- or medium-bristle toothbrush to access and clean these areas. Avoid using hard-bristle toothbrushes as they can scratch your wheels. The toothbrush would be exceptionally useful if your wheels are designed complicatedly.
Next you would need to rinse off the soapy solution off your rims, again with the use of a medium-pressure spray, or you could also use a normal hose. Finally dry your rims with a dry cloth or towel. The use of a dry cloth would help remove any water spots or remaining bits of dirt and grime off your wheels, making them gleam and shine just like how you have always wanted them to be! Follow the above-mentioned pointers, and be the proud owner of a vehicle that has extremely shiny and gorgeous rims that would be the envy of all!

Tuesday, December 13, 2011

Careful Selection and Maintenance of Vehicle Rims

When a car owner wants to modify his or her vehicle, one of the first things that would be considered would be an upgrade of the car rims. The fact that a change of car rims reflects positively on the aesthetics portion of the car is reason enough for most car owners to swap to bigger and lighter rims. But one has to be careful before swapping the original rims with new ones, as there are several factors that have to be considered before the modification is done.

The selection process has to start by first determining if the size of the new rims fit your car’s specifications. Most cars come with standard 15-inch rims, and car owners usually try to swap these rims for 16-inch, 17-inch and even bigger rims. Swapping to one size bigger usually does not pose much of a problem, but if you are jumping two sizes, check with your vehicle’s specifications to ensure that rims of that size are allowed. As long as the overall diameter of your new wheels is similar to your current measurements, or less than 3% bigger, you would not face any complications with the rims. Usually car owners purchase lower profile tires to match their bigger wheels when the swap to larger rims, to compensate for the larger wheels. As long as you have sufficient wheel arch clearance with the new rims, you are doing good.


Selecting lighter rims would also be a commendable move, as it would proceed to reduce the overall weight of your vehicle, and in return you get better fuel efficiency figures from your car. Top speed and acceleration figures would also improve when you have lighter wheels, nevertheless make sure that your wheels are not too light, or they might affect your stability factor.


In terms of maintenance of vehicle rims, you could either accomplish the maintenance works yourself or send it to auto spa to help you with the maintenance. If you want to accomplish the task yourself, get a rim cleaning solution (usually a spray), and spray the rims with this solution before letting the chemical soak for a few minutes. Next you would need to rinse the chemical off with a medium-pressure water spray. The chemical would be able to clear off any brake dust from your wheels, and next you would need a water and soap solution (with a sponge) to help clean away all remaining dirt off your rims. Finally rinse your rims again, and use a dry cloth to wipe your rims dry. This task is pretty simple, and as long as you have the right solutions in place, you should be able to complete it in a few minutes.


Keep your car looking good at all times with proper selection and maintenance of vehicle rims!